Monday, December 20, 2010

Smart Stuff with Twig Walkingstick: Where do deer sleep during winter?

 Twig Walkingstick lives in and around the Wooster campus of the Ohio Agricultural Research and Development Center. His alter ego is Kurt Knebusch, one of our super-talented writers and editors on campus. Each month, look for Twig to answer a reader questions and some additional interesting facts below. After Twig's post, we will be providing some ideas and suggestions on how to incorporate the info in Twig's column into fun science learning for your students and children.

Q. Dear Twig: Where do deer sleep during winter?

A. In two kinds of places. The choice depends on whether it's daytime or nighttime. (I assume here a cold, snowy winter where the deer is. Are.)

At night, deer tend to sleep near coniferous ("kuh-NIFF-er-us") trees. (Coniferous trees you know might include pines, firs, spruces and hemlocks.) A usual spot is next to a trunk under thick, low, sheltering branches. The branches serve as a roof and a blanket. They keep out the wind, slow down how fast heat gets lost and help the deer save energy. A key for a deer to survive winter is to save energy.

During the day, deer sleep more in the open, away from deep, dark woods, a lot of times on a fill facing south or west. Why: To be in the sun. The sun's heat makes them warm. Or at least not as cold.

The technical term for both places is "bed sites." Deermay "bed" —lie down, sleep, or just hunker down and relax—at times throughout the day or night.

Long winter's nappilu,
Twig

P.S. Ohio's native deer is the white-tailed deer. Out west look for mule deer. Also, mules.


Notes from Twig: 
  • Mules, but not mule deer, like in Ohio too of course. And in many other places, such as "Hee Haw."
  • Subspecies of the mule deer (note: not a mule) are the Sitka deer (ditto) and black-tailed deer (ditto ditto). White tailed subspecies are the Coues (said "cooze." "cows" or "coos," depending on who says it) deer and Florida key deer.
  • Sources included "Winter Bed-site Selection by White-tailed Deer in Central Ontario," Journal of Wildlife Management, 1983.
  • Ohio State's experts on deer and wildlife management in general, but not mules, work in the School of Environment and Natural Resources, specifically in the Terrestrial Wildlife Ecology Laboratory.

--

Using this information for education:
Many students are preparing to celebrate the holiday season and dreaming of what they may find under the Christmas tree. Unlike the Christmas trees inside homes which have presents underneath them, nature's Christmas trees (pines, hemlocks and firs to name a few) are often a present to wildlife in and of themselves. 

Written by Colleen Monroe, A Wish to be a Christmas Tree is a fun holiday read that recounts the tale of a pine tree that has grown too large to ever be picked by a family as a Christmas tree. As he begins to cry, his woodland-creature-friends share how important he is to them...how he provides shelter from the storms with his branches, bedding for deer, and many other important benefits. Still sad, the tree is cheered when the animal s decorate him on their own and make him their own special Christmas tree.

This is a fun book to read during the holiday season, because it teaches the importance of friendship and helping others, but children can also learn about the important ecological functions of trees for wildlife in a fun way. And that includes providing cozy beds for deer in winter. Thanks, Twig!

Monday, December 13, 2010

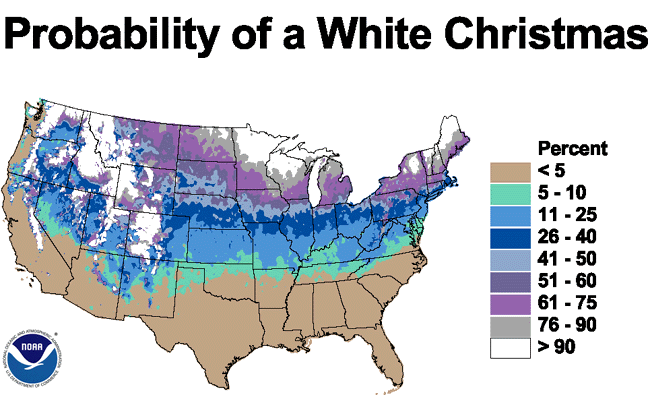
Dreaming of a white Christmas?

Are you (and your little learners) dreaming of a white Christmas? How about if you take those dreams and turn them into predictions?

Here at OARDC we have an active weather station at our Wooster campus, and at 17 other sites across the Buckeye State. Current and past data for these stations is available free of charge online. So you can certainly check our weather at anytime, but that still leaves the question: will we have a white Christmas this year? Here's a fun way for older elementary to high school students to use historical weather data to create a map and color key to illustrate the likelihood of a white Christmas while learning about contour maps. The following lesson plan is based on the lesson available at educationworld.com
The National Climatic Data Center has calculated the probability of a White Christmas for the entire US (below). This map is based on the full range of data for each site rather than the 1971-2000 normal.

Here's what you'll need:

  • A color temperature map (many newspapers like USA Today publish such a map daily and are even available online)
  • Recording of the song I'm Dreaming of a White Christmas  (optional)
  • White Christmas Weather Data worksheet available free online
  • US outline map available free online
  • Atlas
  • Crayons or colored pencils
Will your students enjoy a white Christmas this year? Let's see what the historical weather data has to say about the likelihood for your part of the country...
  1. Start by showing students a color temperature map. Discuss how the map can be a quick guide to determine the current or high temperature for the day. Point out the color key as a tool to guide interpretation of the map.
  2. Ask students if they have any idea how this map, called a temperature contour map, is created. The color contour map is imply a pictorial representation of weather data. In the case of a contour map that shows the current temperatures around the United States, the data is a long list of temperatures in cities around the country. Students could create their own color contour map by gathering this data, plotting the temperatures in a wide variety of locations on an outline map and "connecting the dots" to approximate the approximate areas in which the temperatures are in the 20s, 30s, 40s, 50s, etc.
  3. For practice, you may want to provide students with data from a local paper on temperatures recorded the previous day or the high temperature estimate for the current day. Use the list to plot locations and temperatures. Demonstrate how students can create a color contour map to show those high temperatures. Then have students map the low temperatures of the day from the same source.
  4. Introduce and play the song I'm Dreaming of a White Christmas and pass out the White Christmas Weather Data worksheet. This worksheet includes figures representing the percent likelihood of snow being on the ground Christmas Day in 40 cities around the United States. This worksheet is intended for grades 5 and up. Younger students can focus on a state or region and map data for that smaller area. For example, the Illinois State Climatologist Office provides data for 13 sites across Illinois on the likelihood of snow on Christmas day. You may be able to find similar data for your state or region as well. Stormfax also provides a nice set of data for various states and regions.
  5. Have students plot the data on their map then create a color key to guide them as they color their contour maps. The color key will denote a different color for locations where the percent likelihood of snow on Christmas day is 0-20 percent, 21-40 percent, 41-60 percent, 61-80 percent and 81-100 percent. Be sure students understand that the maps they create are a simple approximation of the likelihood any area will have an inch of snow or more on the ground Christmas day. Geographic location can account for vast differences in snowfall in a small area. For example, their map will show that much of Arizona has little chance of snow cover on Christmas day, but a small area of the state, around the city of Flagstaff ( located in the mountains in the middle of the state) has a 57 percent chance of snow coverage on Christmas day!
  6. Have students share their maps with one another and with the class and discuss how accurately those maps depict the likelihood of snow cover. Check maps for accuracy in plotting city locations, but grant leeway in judging the final contour maps. Some variation needs to be allowed for where the controus might break between the plotted cities. Students should also have the opportunity to express in writing thelessons they learn (math and geography) from the activity.

Monday, December 6, 2010

Let's make trees!

I've been brave enough to commit to working with two Head Start centers this year on a monthly basis, working with their children on science and agricultural literacy. Besides the basics of learning where their food comes from, I want these children to understand the incredible diversity of American agriculture and to be excited about science and all the wonderful things just waiting to be discovered by their young minds.

So far this year, I've shared with them about insects and spiders (just in time for Halloween...and let me tell you, I was impressed with what those preschoolers already knew when I got there!). Then we talked about the life cycle of a pumpkin and read some cool pumpkin books (you can't believe what a great job they are doing of growing their pumpkin seeds!). And in November we learned about the different body parts and adaptations of wild turkeys. I'm telling you, these preschoolers are impressive and already knew what a turkey's caruncle was before I was even walked in the door! So I thought they deserved an extra fun treat as Christmas approaches.

We did our December visit on Christmas trees!

We started out by talking about how Christmas trees are grown on farms, how they benefit the environment by absorbing carbon dioxide and releasing fresh oxygen, how they are a renewable resource, how they are recyclable, and how they preserve green space. The National Christmas Tree Association has some great resources on their site with this information as well as a lot of myths debunked about real Christmas trees. For example, did you know there are more than 4,000 Christmas tree recycling programs in the United State alone?

Then we read A Wish to be a Christmas Tree by Colleen Monroe.
This cute tale tells the story of an old tree on a Christmas tree farm that is sad because he was never chosen by a family to be a Christmas tree. He knows now that he's too large to be chosen by a family to be their Christmas trees, but the animals tell him all about the many benefits he provides to them and while he is asleep, they decorate him and make him their own special Christmas tree.

Afterwards, we made our own little Christmas tree snacks. We started with Cool Whip, which I colored with green food coloring in advance. Each child then got their own sugar ice cream cone and "iced" the cone with the Cool Whip to make a tree. We decorated the trees with M&Ms for ornaments and enjoyed a good snack. This is a fun little treat either in the classroom or at home. So enjoy!

Monday, November 29, 2010

Tree-rific math!

This month I'm gearing up for a big lesson on Christmas trees with about 200 preschoolers. Lucky me, right? But as I was out looking for "the perfect idea" for sharing about the role of Christmas trees and Christmas tree farmers with my preschool crowd, I found a cool resource for teaching real-life mathematics to older students using Christmas trees!

Photo from the United States Department of Agriculture
Natural Resource Conservation Service
The lesson comes from the Massachusetts Christmas Tree Association, and they offer an educational package free of charge (you just pay $5 for shipping) called The Annual Cycle of the Tree Farmer. If the rest of the materials are as cool as this fun, hands-on lesson, the $5 shipping fee is a steal!

Students will develop and understanding of area,the size of an acre and spatial relationships as well as learn different strategies for determining land area of irregular polygons in this lesson designed for students in grades 6 and up (adaptations for younger students are included at the end of this lesson).

The assignment revolves around this scenario:

Mr. & Mrs. Rice recently sold their dairy her and want to convert their former pasture land into a tree farm. They have a map of their property that shows the pasture land. Literature from the Massachusetts Cooperative Extension agent about growing evergreen trees suggests that trees can be successfully grown in a 6' x 6' arrangement with trees planted 6' apart in rows that are 6' apart. With this arrangement, 1,200 trees can be planted per acre of pasture land. An acre is a surface are of 43,560 feet.

Side note: I love the name Rice used in the scenario above! The land where our OARDC campus is located originally belonged to the Frederick Rice family. Frederick was a veteran of the Revolutionary War and eventually divided the farm between his two sons Simon and Barnhardt.


Question for students to answer: How many trees can the Rice family plant in their former cow pasture? A map of the property is included in The Annual Cycle of the Tree Farmer package.

Suggestions for teaching:

  1. Take the students outside and measure an acre on your school or personal property to help them understand how large an acre actually is. Before going outside, explain that since the square footage of an acre is 43,560 feet, the easiest way to measure out an acre is to create a square or rectangle with an area this size (Area = Length x Width, and in this case the area would be 43,560). Have students experiment in the classroom with calculators to find what combination yields a product of 43,560. Just a few of the possible solutions include: 208.47 x 208.47, 10 x 4,356, 100 x 435.6, 150 x 290.4, etc. Students should discover that the width will always equal the area (43,560 feet) divided by whatever length they choose. The students can then be divided into groups of 4 to go outside, measure and stake out the bounds of their acre using different dimensions for each group. This will help them understand that several different polygons can have the same area (in this case, 1 acre).
  2. Divide the students into groups of 3-4 and distribute the maps of the farm showing the pasture land that is to be planted to trees. Focus on 1 pasture and show it on an overhead. Give students 5 minute to discuss with their group possible ways to find the square footage of this pasture, then present their solutions. If using the map included with the Annual Life Cycle of a Tree Farmer, the lengths on that map have been converted to actual lengths using the map scale, where 1 inch = 100 feet. If you don't have the Annual Life Cycle of a Tree Farmer, you can create your own map selecting pasture shapes appropriate to the age level of your students. Perhaps the pasture shape is a trapezoid (calculate the area by dividing it into 2 triangles and a rectangle, then add the areas together) or a series of different shaped rectangles
These are fun, hands-on ways to help students learn about basic mathematical concepts and real-life problem solving. Which is always a good idea when it comes to minimizing the "But why do I have to learn my math?" questions! 

Monday, November 22, 2010

Smart Stuff with Twig Walkingstick: Turkey Beard? Weird!

Our favorite guest blogger is back again and this time he's talking turkey. It's Twig Walkingstick!  Twig lives in and around the Wooster campus of the Ohio Agricultural Research and Development Center. His alter ego is Kurt Knebusch, one of our super-talented writers and editors on campus. Each month, look for Twig to answer a reader questions and some additional interesting facts below. After Twig's post, we will be providing some ideas and suggestions on how to incorporate the info in Twig's column into fun science learning for your students and children.

Q. Dear Twig: Did you know that turkeys have beards?

A. Actually, I did know that. And I don't get to say that very often. Ha! Wait, not funny.

The "beard" of the turkey hangs down from the middle of the turkey's chest. It doesn't hand down from his chin. Though that would be cool if it did. It looks like a long, skinny, long-haired tail. Like the tail of a horse if the horse were as big as a miniature poodle and the tail were on the front, not the back. Scientists call the "hairs" of the beard "bristles of  "mesofiloplumes" ("MEZ-uh-FILL-uh-ploomz") - stiff, feather-like structures.

A male turkey, called a tom, starts to grow a beard at about 11 weeks old. The beard gets longer as the tom gets older. Sometimes it gets up to 12 inches long. It helps the tom attract females, or hens. A big, long beard means a big, strong tom. Or at least an older one. One that knows what it takes to survive, to not get eaten by a fox or an owl, and live to a long-bearded age. Hens dig that.


Gallopavically,
Twig

P.S. The wild turkey's scientific name: Meleagris gallopavo. Some hens have beards, too.


--

Notes from Twig: 
  • In the wild, in wild turkeys, most toms and some hens have beards. Also: some toms have more than one!
  • On farms, in farm turkeys, some toms don't have beards, some hens have them, and either way most of those beards are shorter than the beards of wild turkeys in the wild. (Wild!)
  • To learn just about everything you might ever want to know about turkey beards, read The Beard of the Wild Turkey by A.F. Schorder in the October 1957 issue of the journal The Auk. (Wing bump to the Pennsylvania chapter of the National Wild Turkey Federation for the tip!)
  • Keen on turkeys? Want to try raising one? Try the Ohio 4-H Project #166, Raising turkeys.
You can clearly see the beard on the chest of this eastern subspecies of wild turkey.
Photo courtesy of Larry Price and the National Wild Turkey Federation.

Using this information for education:
This is a great time of year for students to learn about turkeys and have some fun, too! Thanksgiving is a great time to learn about the differences between today's domestic turkeys and wild turkeys. You might not this so, but the difference is huge...and it's not just the color difference!

For a fun activity to teach students about the purpose of the difference features and characteristics of wild turkeys and a little more about the science of adaptation, be sure to check out our post from earlier this month on turkey survival!

Tuesday, November 16, 2010

Preparing for the feast

I don't know about you, but my kids are ready for Thanksgiving. Whether it's the turkey, the pumpkin pie, the days off school or the "official" start of the Christmas season, they are ready. So while their minds are on the upcoming feast anyway, it's a perfect time to practice reading charts, interpreting data and learning about how important agriculture and food production are to state's economies. Here in Ohio, agriculture is the largest industry in the state. That makes it pretty important!


Let's start by taking a moment to look at just a few of the "staples" of a traditional Thanksgiving feast:

Turkeys
The United States is the world's largest producer of turkeys. So where are these birds raised? Here are the top 10 turkey producing states in the country with the number of birds raised in each

  1. Minnesota: 48 million
  2. North Carolina: 40 million
  3. Arkansas: 31 million
  4. Missouri: 21 million
  5. Virginia: 18 million
  6. California: 16 million
  7. Indiana: 14.5 million
  8. South Carolina: 12.5 million
  9. Pennsylvania: 11.5 million
  10. Iowa: 9 million
Source: United States Department of Agriculture 2008 numbers. Print off the chart from the USDA, page 7, and ask students to rank the top 5 or top 10 turkey producing states either by total dollar value, number of turkeys, or even the average price per pound in each state. 

Follow up by asking age-appropriate questions, like how many turkeys are raised on farms in Indiana? Which state produces more turkeys, Arkansas or Virginia?  Which state produces the most turkeys? Which state produces fewer turkeys, Missouri or California? How many more turkeys are produced in Indiana than South Carolina? How many turkeys are produced in the three top turkey-producing states?

Even more fun? Take a look at the blog On the Banks of Squaw Creek to hear the tales of our teacher and blogger friend Katie,  who lives on one of those turkey farms responsible for making Iowa a top-ten turkey-producing state. She tells lots of turkey tales and has cool pictures of what modern turkey production looks like.

Education World has a worksheet available for download on sweet potato and cranberry production that explores similar questions, too.

Another great tool to look at is the American Farm Bureau's annual Thanksgiving basket survey. Each year they shop for the same list of Thanksgiving feast staples to estimate the cost of preparing a Thanksgiving dinner. The list remains the same from year to year, so students can look at the relative costs over time and chart those as well. They can also track inflation over time and compare those results as well.

Wednesday, November 10, 2010

Students will "gobble" up this food web

Wondering how to make learning about food webs fun for your students? Here's an activity perfect for November (when we're all dreaming up the upcoming turkey dinner) where students will investigate the concepts of food webs and food chains. This is alos a great opportunity for them to learn about and describe the role of wild turkeys, plants and other organisms in cycling energy and matter. Another plus? this activity is easily adaptable for students in kindergarten through 8th grade and addresses science and environmental education national learning standards.

This photo of a Rio Grande subspecies of wild turkey is courtesy of the National Wild Turkey Federation
So what are food webs? Basically, food webs are the feeding relationships among the different species in a community. Each member of a community can be classified as either a consumer or a producer. Producers, well, produce energy—generally from the sun through photosynthesis. Producers harness the sun's energy to make their own food. On the other hand, consumers are those members of the community who consume energy by eating other organisms. Producers are the base of the food chain and very important, because all of the energy in the community originates with them.


Start off by discussing the definitions of producer and consumer and have students list examples of each, Write the name of each producer and consumer on an index card (1 per card) and tape each piece to the chalkboard or whiteboard. To make it even easier, you can print off these printable cards with list numerous members of the community, whether they are a producer or consumer, and what they eat. Younger students might find it easier to understand if each animal were represented by a pictureYou and your students may also be interested in learning more about wild turkey predators in particular for this lesson.

Then have the students come to the chalkboard and draw lines to show the energy chains.  You can also place the cards on the floor and connect them with yard. Students can then physically walk through a specific energy chain in the food web. Students can then record their specific chain on a piece of paper or in a science journal.

Once each student has recorded their chain, the teacher can pull an organism from the web. Have students discuss which food chains the removed organism affected. Repeat with other organisms from the chain and continue to discuss.

To add a fun twist, replace all the organisms in the food web and have students secretly select and record a second energy chain. Once each students has recorded their new secret food chain, the teacher slowly randomly begins to remove and organism. After the first organism is removed, record who is "dead" and who is "alive." Continue to remove organism and record the casualties and survivors until all the energy chains have been eliminated.

Here are some questions for discussion:

  • What did the students notice when all the organisms had died?
  • What strategies to herbivores use to avoid being captured? Answers will vary, but examples might include mimicry, mobbing behavior, camouflage coloration, safety in numbers, physical or chemical combat, etc.
  • What strategies do carnivores use to capture their prey? Again, answers will vary but might include binocular vision, sharp teeth, heightened sense of smell, sharp claws, camouflage coloration, hunting in groups, physical or chemical combat, etc.
  • How do organisms compete for food? Organisms usually compete for food through adaptations, performance, heard-to-head competition, or predatory competition. Students' answers may vary. For more on the adaptions of wild turkeys, be sure to check out our post from last week called "This turkey is staying alive!"
  • What would happen if there were more predators or prey in a particular community? Explain. Answers may vary, but could include overpopulation of species, which would lead to an increase in disease and a decrease in available food and space for that species.
  • How might humans affect the food web? Humans could negatively impact the food web through pollution and habitat destruction. However, humans can also positively impact the food web through habitat creation, establishing wildlife areas, and helping to control overpopulated species. It's important for students to realize not all human intervention is bad.
This lesson was based on and adapted from the "Turkey Web"activity found in the National Wild Turkey Federation's Wild About Turkeys k-12 curriculum and activity guide.

Thursday, November 4, 2010

This turkey is "staying alive"

November is here, so it's time to talk turkey. Turkey adaptations that is. Adaptations are physical or behavioral characteristics that plants or animals have to help them survive. But have you ever wondered how to make learning about adaptations fun for kids? Here's the answer: a quick and fun lesson on how the adaptations of wild turkeys help them stay alive!
This is an Eastern subspecies wild turkey...not to be confused
with the domestic turkey that graces most tables at Thanksgiving.
Photo by John Ford and the National Wild Turkey Federation.
This is a fun, hands-on activity...and now is the perfect time of year for it! Not only are your (and your students) probably starting to dream of all the goodies including the star player TURKEY on your Thanksgiving tables later this month, but many of the materials needed for this activity can be picked up at a bargain price now that Halloween supplies are on clearance this week!

This photo of a flock of Eastern Wild Turkeys was taken by Henry Zeman.
Courtesy of the National Wild Turkey Federation.

The following lesson is from the book Wild About Turkeys by the National Wild Turkey Federation.


  1. Start of by telling students they'll be learning about ADAPTATIONS. In fact, adaptations are so special that every time you say the word "ADAPTATIONS" students should wiggle their thumbs. 
  2. Define ADAPTATIONS and why we talk about them.
  3. Ask for a volunteer. Ask the other students if the volunteer could survive as a turkey in the wild. Nope...not without some wild turkey ADAPTATIONS. (Don't forget to wiggle those thumbs!)
  4. Now is the time to go through you ADAPTATION box and briefly describe how each of those items would help a wild turkey while you dress the volunteer with their new ADAPTATIONS. What's in your box? Here are some ideas:
  • Feathers: Use a down vest. Feathers help turkeys stay toasty warm. Their normal body temperature is 108 degrees! You can also use a camouflage jacket. The colors help turkeys hide from predators
  •  Tail feathers: Bright and colorful will do the trick! For males, these feathers help in strutting and make the female turkeys agree to a date!
  • Beard: Hit the Halloween clearance aisle and grab a costume beard. Turkey beards are a good indicator of gender and age.
  • Multi-colored head: A tri-colored bicycle helmet is a good bet for this one. The red, white and blue on turkeys' heads is a form of communication for the birds.
  • Carunkles:  Use a red neck tie. Turkeys can change the carunkles size and color to communicate as well.
  • Snood: This is as easy as a red balloon.Turkeys can change the size and color of their snood to communicate with each other and also to help regulate body temperature.
  • Beak: Here's another chance to take advantage of that Halloween clearance aisle by snagging a costume beak. Turkeys use their beak to catch food, and it's small, stout shape is perfect for the kind of food they eat. Can you imagine what a turkey would look like if it had a beak like a toucan? Ask students if they think turkeys can chew and if they have teeth.
  • Gizzard or Crop: A cheese grater is a "grate" replica of the small stones that are located in the crop and that grind up the bird's food.
  • Spurs: Cowboy spurs can be used to show how male turkeys use their spurs to fight other males. The best fighter gets the girl! Males sometimes also use their spurs as protection from predators.
  • Long toes: Plastic garden cultivator tools can show how turkeys use their feet to scratch the ground and dig up acorns, chufa, grasshoppers, worms and more.
  • Fast running: Jogging shoes make a nice visual. Did you know turkeys can run about 19 miles per hour?
  • Bones: PVC pipes or dryer vents can show how turkey bones are very light...in fact, they are almost hollow. Turkeys can fly about 55 miles per hour at top speed!
  • Eyesight: Time to hit the Halloween aisle again for some googley glasses. A turkey's best defense is good eyesight, and turkeys can in fact see in color.
  • Strutting: One more thing turkeys do to get a date! Male turkeys do this to impress the ladies. Have your volunteer strut or dance whil playing "Staying Alive." 
Have the students vote as to whether or not they now think their volunteer's ADAPTATIONS are enough to stay alive as a wild turkey. Older students may be asked to think about their favorite animal and identify a few of that animal's ADAPTATIONS to share with the class. And what about our ADAPTATIONS as people?
Photo by Maslowski & the National Wild Turkey Federation
 Wonder why the students wiggled their thumbs every time the word ADAPTATION was mentioned? Try this experiment. Tape thumbs down to the rest of the students' hands and ask them to try everyday tasks like buttoning, zipping, getting a glass of water, writing their name, etc. Do our thumbs help us stay alive? You bet!

And speaking of adaptations, did you know domestic turkeys have their own set of ADAPTATIONS, too? Today's domestic turkeys are white and are descendents of a no extinct subspecies of wild turkeys. They are bleived to have been domesticated by Native Americans in Mexico between 150 BC and 400 AD. Spanish explorers brought Turkeyes to Spain, and by 1530, domestic turkeys were common throughout Europe. They arrived in the US from England in 1607.

Commercially-raised domestic birds look quite different from their wild relatives as you can see. Their feathers are usually white, which is preferred for the cleaner appearance of the dressed birds. Domestic birds are also so heavy they often have difficulty flying. Their neck skin (wattles) is heaver and their snood is longer. Their temperament is also more suited to confinement.

Domestic male turkeys tend to be vocal and respond with a squeaky gobble to almost any noise. Females use calls similar to their wild counterparts, including the cluck, yelp, cutt, purr and kee-kee.

From 1930 to 1987 when interest began in increasing the American wild turkey population, efforts were made to mate wild and domestic turkeys to increase the populations. However, the resulting offspring were unable to survive in the wilderness, having lost their survival instincts. They were quickly eaten by predators, even if the offspring contained only a small percentage of domestic turkey in their genetic makeup.

Interested in learning more about modern turkey production? Visit our good bloggy friend Katie at On the Banks of Squaw Creek. Her family raises turkeys for a living and their birds feed the processing plant that supplies turkey to all the Subways west of the Mississippi. Katie does regular turkey features and fill you in on all the happenings and yes, sometimes even the heartbreaks, of farm life.

abc button

Tuesday, November 2, 2010

Halloween is over, so what now?

Wondering what to do with those leftover Jack-O-Lanterns? Now's the perfect time to go back and look at our fun lesson on pumpkin decomposition! 'Cause what's not to love about getting a useful lesson out of something you were probably just going to throw away anyhow?

And, I recently found two really cool books to go right along with that lesson on decomposition. Both talk about the plan life cycle in fun, easy-to-understand ways. In fact, we spent last week sharing those lessons with preschoolers, who loved the stories and illustrations (not to mention they ooey, gooey, slimey disembowelment of the pumpkins)!

The first book is Pumpkin Jack, which is both written and illustrated by Will Hubbell. I especially love this book for this activity because it starts the life cycle off with the Jack-O-Lantern phase of the pumpkin and has great illustrations of the slimey, rotten phase of the pumpkin. Then the seeds start to grow in the spring and the little boy ends of with another Jack-O-Lantern. This is and especially great story to share if you have kids who are reluctant to get rid of their carving masterpieces.

I also love It's Pumpkin Time! by Zoe Hall and illustrated by Shari Halpern. I especially love the illustrations, which definitely remind me of some of my favorite Eric Carle books. This book follows the adventures of siblings who plant and care for their own pumpkins. Especially helpful are the illustrations of the life cycle at the end of the story. I copied these drawings, cut and laminated them into smaller pieces and used them in a sequencing activity...which worked really well.

Halloween may be over, but those pumpkins are still good for something!

Monday, October 25, 2010

Smart Stuff with Twig Walkingstick: Now THAT would be a Great Pumpkin


Twig lives in and around the Wooster campus of the Ohio Agricultural Research and Development Center, where he enjoys the prairie plant in Secrest Arboretum. His alter ego is Kurt Knebusch, one of our super-talented writers and editors on campus. Each month, look for Twig to answer a reader questions and some additional interesting facts below. After Twig's post, we will be providing some ideas and suggestions on how to incorporate the info in Twig's column into fun science learning for your students and children.

Q. Twig: What if there were flying pumpkins?

A. 
Wobbity, wobbity. Um, yes, well, if there were, you’d have to keep looking up all the time so you wouldn’t get klonked in the head by one. But: As far as I know, for better or worse, there are no flying pumpkins.


Reason being, pumpkins don’t have wings. They also don’t have propellers. Nor Rolls Royce vectored-thrust turbofan engines, as used on the AV-8A Harrier vertical/short takeoff and landing aircraft. A pumpkin with vertical/short takeoff and landing capabilities would be a powerful pumpkin. And hard to carve.


The Great Pumpkin flies but isn’t real. He’s in that Charlie Brown Halloween special. He “flies through the air to deliver toys to all the good little children in the world,” say Linus and Wikipedia. “(He) is likely to pass by anyone who doubts his existence.” Which means no Nintendo DS for me, boo!


Birds have wings. So do bats and most insects. Seeds with wings are called samaras. But pumpkins and their seeds aren’t samaras.


The wind beneath your pumpkin,
Twig


P.S. Examples of samaras are those spinning “whirligigs” that come down from maple trees.

Notes:
To find out more, try the Ohio State University Extension fact sheets “Growing Squash and Pumpkins in the Home Garden”  and “Growing Giant Pumpkins in the Home Garden” (but not flying ones); Jane’s All the World’s Aircraft 2007-2008; It’s the Great Pumpkin, Charlie Brown (1966); and “Blowing in the Wind: Seeds & Fruit Dispersed by the Wind."


Webster’s New World College Dictionary gives two ways to say “samara”: “SAM-er-uh” and “suh-MAR-uh.”

Using this information for education:
Pumpkins are a fabulous fall plant that most students are familiar with carving. In addition to being a great tool to study decomposition, they also provide an excellent opportunity to learn about plant life cycles. Students can draw or order the sequence of pictures depicting a pumpkins life cycle...but be sure not to leave out that important part of decomposition.

I also love all of the great pumpkin activities that reach across the curriculum from literacy to art to math and science and yes, even recipes the Mrs. Nelson provides. These are some great ideas!

Tuesday, October 19, 2010

Pumpkin, pumpkin, what comes next?

It's that time of year. Pumpkin patches and corn mazes are thriving. Families and even classrooms of students are picking pumpkins and decorating and carving them. But have your students thought about what comes next? After the pumpkin is carved?

This is a perfect opportunity to teach your students about the science of decomposition. Decomposition is one of the most importance processes in the garden and in nature. It's the process by which fungus, bacteria and invertebrates chance matter that was once alive (as in fallen leaves, rotting logs, and yes, even pumpkins) into fertile soil. It's not just a necessary part of the process in the garden; it's a crucial part of the life cycle. The following experiment will provide a wonderful opportunity to experience and observe this immeasurable important ecological function first hand.

The details of decomposition will become more familiar to children as they get older. The important concept for young children to walk away with is that the dead material helps grow new life. As they watch the pumpkins in this experiment rot, they will see beetles, worms, mold and other tiny organisms participating in this cycle. But there will also be millions of organisms too small to be seen participating in this process.

What you will need:

  • 2 pumpkins (1 carved and 1 not carved)
  • hand lenses
  • Optional supplies: Sign explaining your experiment, your camera and the books Pumpkin Pumpkin by Jean Titherington and The Story of a Garden by George Levensen

You will need to find a protected spot near your classroom or home where you can leave your pumpkins to decompose on a patch of soil or under a bush. If you're conducting this experiment at a school instead of your home, it's a good idea to talk to the grounds staff about your experiment and you may want to put up a sign to prevent your experiment from getting "cleaned up."

  1. Ask the children what they think will happen if the pumpkins are left outside. Record their ideas and place the pumpkins in their outside spot. Take a picture if possible to track the process. Ask them to describe what the pumpkins look like now and record their answers.
  2. Visit the pumpkins every day or at least twice a week. During that time, you can read pumpkin stories out load, starting with Pumpkin Pumpkin and later, near the end of your experiment, Pumpkin Circle. Each time you visit, ask the children to describe the appearance of the pumpkins and what is happening. Record their observations with pictures and/or words. Take another picture. 
  3. Using hand lenses, have students search for worms, beetles and other decomposers at work and discuss their role in "munching up the pumpkins" and helping them turn back into soil. Be sure to have the children look for mold and fungus as well.
  4. When the pumpkins are gone (or mostly gone), continue to visit the spot to see if new plants begin to grow there.
  5. Review the predictions the class made about what might happen to the pumpkins. Display your photographs and read the children's observations about the pumpkins over time. Ask what happened to the pumpkins, Why? What helped the pumpkins break down? What would happen if they didn't break down like this?
Decomposition is a concept that's easy to reiterate on a frequent basis, especially in the garden. What might happen to a tomato left on the ground? Who might want to each my apple core? There are many possibilities to keep in mind and remind students of the life cycles taking place in nature and in the garden.

Looking for more pumpkin fun? Here are some ideas for going even deeper!
  • Place another object, like a pile of wet leaves, another fruit or vegetable or a piece of plastic or styrofoam next to the pumpkin to compare what happens to it. Which decomposes more quickly? Which has more bugs and decomposers on it? Watch and learn together!
  • Place 4 to 8 pumpkins a few feet apart and have students hope over each one. It's pumpkin leap frog!
  • Try a pumpkin slalom, where children run in an s-shape through a line of pumpkins.
  • Have a pumpkin seed tasting. Roast seeds from a carved pumpkin or buy them in the store. Taste and compare seeds prepared in a variety of ways: roasted, toasted, salted, unsalted, etc.

Tuesday, October 5, 2010

It's all about bulbs

Are you a flower fanatic? Do you love the bright, vibrant colors of the first blooms of spring? Now is the perfect time to plant bulbs for your spring enjoyment...but did you know it's also a great time to study plant life cycles with students?

That's right! Instead of studying flowers and plant life cycles in the spring, consider moving that up to your fall curriculum instead. Why? When you study plant life cycles in the fall, and incorporate the chance for students to plant their own bulbs at your school, the bulbs will be up in plenty of time for the kids to enjoy them before they head home for the summer.

Planting bulbs also provides a great opportunity for students to make their own hypotheses about the bulbs and test those hypotheses in real life. Tulips and daffodils are both great choices. Here are some great questions for your students to answer:

  • What date will the plants first emerge in the spring?
  • When will you see the first bloom?
  • What percentage of the bulbs will live through the winter and produce flowers in the spring?
  • If using mixed color tulips, how many of each color blossom will there be?
On top of that, studying bulbs as part of your plant life cycle curriculum provides a great chance to talk about the plants on your plate....and all the different plant parts we eat every day. From the broccoli "flowers" to the carrot "roots"...and who can forget the bulbs we eat, like onions?

For more great ideas on how to incorporate science that's All About Bulbs into your curriculum, check out the book Growing Together published by Ohio State University Extension. The book is chock-full of lesson plans and activities for incorporating garden-based science into your classroom.
Tuesday Tag-Along

Tuesday, September 28, 2010

Wondering where we've been?

Um, have you missed us? It's been a while since we've posted. I'd say we've been blown away with so many things to do, but to be honest, that's just a little too close to the truth. Our Wooster campus was recently struck by a tornado, and we're still recovering. In fact, the recovery is likely to be a long process. But we have true Buckeye spirit and will emerge stronger and better, I have no doubts.

Here's a little peak for you of what's been happening here in our next of the woods.

Through it all, we remain most thankful that no people or animals were seriously injured or killed.

And if you had been interested in our Science of Agriculture program that I discussed in our last post, that event has been cancelled because of the severe amount of damage on our campus at this time.
Tuesday Tag-Along

Wednesday, September 1, 2010

The Science of WHAT?!?

We host a huge event for students in grades k-12 on our Wooster, Ohio campus each fall. It's called the Science of Agriculture. Yep. You heard me...AGRICULTURE! If you think agriculture is just a bunch of cows, sows and plows, this event will show you that you couldn't be farther from the truth!
 Yes, students can learn about cows at the session called For Your InFARMation that will teach students about Ohio's dairy industry and the farms and farmers that provide safe, affordable and nutritious dairy products to eat...and they can also learn about Ohio's beef industry, too.
 And yes, students can learn about sows (female pigs) from Ohio Pork Producers at Pig Out! Visit a Hog Farm for elementary students and another more advanced session for grades 6-12.
 And yes, they will learn about plows...and how many Ohio farmers are not using plows at No Till Know How where students will learn about the importance of conservation tillage and see the country's oldest continuous no-till plots.
 But students will also learn about Plant Doctors (we call them plant pathologists) who diagnose and work hard to prevent plant diseases. And they'll even get to try their hand at being a plant doctor.
 They will learn about Who's Been Tickling Your Toes as they take samples and assess stream water quality and diversity for themselves while learning about the important difference those of us who live in headwater areas (like Ohio) can make in water quality hundreds of miles away.
They will learn about the Mendelian Genetics behind today's agricultural products and breeding programs.
 They's learn how agricultural engineers are literally Engineering the Future by improving crop production systems with new designs and technologies...and even how those technologies are being used in space travel.
 They'll learn about Sensational Soil and Creating Compost and how they affect the envionment.
 They'll see our Greenhouse Laboratories at work and even make their own mini greenhouse to take home.
And so much more! In fact, there's so much more I'm going to be discussing this fabulous program all month long!

Science of Agriculture takes place at OARDC's Wooster campus on October 5 for grades k-5 and on October 6 for grades 6-12. It's fun, free-hands-on science education. For more information on the sessions offered or to register online, check out our Science of Agriculture site.

Friday, August 20, 2010

Back to School with Twig Walkingstick: The Pencil Tree

Twig lives in and around the Wooster campus of the Ohio Agricultural Research and Development Center, where he enjoys the prairie plant in Secrest Arboretum. His alter ego is Kurt Knebusch, one of our super-talented writers and editors on campus. Each month, look for Twig to answer a reader questions and some additional interesting facts below. After Twig's post, we will be providing some ideas and suggestions on how to incorporate the info in Twig's column into fun science learning for your students and children.


Q: Dear Twig, What kinds of wood do they make wood pencils out of?


A. My feathered friend Weezerbird told me something at lunch last week. (He had grubs. I had leaves.)  


He said, “That place you work at (Ohio Agricultural Research and Development Center, part of Ohio State University) has the biggest incense cedar tree in Ohio.”


I said, “What’s an incense cedar tree?”


He said, “The tree they make pencils out of.”


And he was right. I checked. (He actually usually is.) (Don’t tell him I said that.) 


American pencil companies make their pencils out of wood from California incense cedar trees. Reasons: The wood is soft. Soft for a wood, that is. So pencil-makers can shape it into pencil shapes easily. It sharpens easily, too. It doesn’t make splinters. And also it smells good.


Incense cedars are coniferous evergreens. As, for example, pines are. Incense cedars grow in the wild out West. But people plant them in other places, too.


Writefully,
Twig


P.S. Find Ohio’s No. 1 incense cedar in Ohio State’s Secrest Arboretum!


Notes:
The California incense cedar is a specific species: Calocedrus decurrens. There also are species that have the common names Taiwan incense cedar and China incense cedar.


One hundred or so years ago, U.S. pencil-makers made pencils out of eastern red cedar trees. But those got used up and scarce. So the switch was made to California incense cedar trees, which were and are easy to come by out West, including now in managed plantings. In other parts of the world, people make pencils out of eastern red cedar relatives.


Secrest Arboretum is part of Ohio State’s Ohio Agricultural Research and Development Center in Wooster.


Follow these links to learn more about Ohio’s biggest trees and pencil-making details.


Using this information for education:
Students (and especially their parents) spend a lot of time getting ready to go back to school, and one of those traditions is back to school shopping. But have you ever considered talking about those purchases and supplies your students will be using throughout the year as an educational topic and not just a tool?


In our last post we talked about the importance of teaching economics. This is another great (and fun) example of a product to talk about. This example also shows how production has changed over the years based upon factors like the supply (and demand) of specific varieties of trees!


Want to know more about these pencil trees? Here are some follow up questions Twig answered when this column first appeared in September 2008:


Q. Dear Twig: I know something else they make pencils out of. It isn’t plastic, either. It’s paper!


A. Excellent! You’re right. There are companies that make pencils out of recycled paper. (The part of the pencil you hold, that is. Not the graphite.)  Some of that paper is recycled newsprint — newspaper paper. Some of that paper is recycled money — worn-out bills (dollar bills, etc.) that the government took out of circulation (collected to keep people from using anymore) and shredded. There are pencils made out of sawdust, scrap cardboard and blue-jean scraps, too.


Whatever the case (The pencil case! Ba ha ha ha ha ha heeeeeeee!), a strong glue holds it all together so it looks and is shaped like a normal wood pencil. Making new pencils from thrown-away stuff puts trash to good use and saves trees.


Did you know you can make pencils out of twigs? Twigs from trees, that is, not me. You cut them, drill them, and fill them with graphite. I’d find that a bit uncomfortable.


Disjointedly,
Twig


P.S. Q. Why did the elephant use a recycled-paper pencil? A. His pen broke. Heeeeeeeeeeeeeee!


Notes:
Makers of really nice twig pencils include John Wyant of Minnesota,  (crayons, too!)and Roger Plant of England.


Q. Dear Twig: So what are those recycled pencils like?


A. Pretty much like regular pencils. You hold them the same. You write with them the same. I have one here in my hands. It’s made out of recycled newsprint. It’s painted green. The paint feels smooth. The graphite, the “lead,” is normal gray.


I sniff the pencil. It doesn’t smell like a regular pencil (which owes its scent to incense cedar wood.) I smell a tiny paint smell, though. But you have to have the pencil up your nose, or at least right under it, to detect it.


I taste it. Myem, myem. I doesn’t seem to have any taste. (Spit.)


I sharpen it. I stick it into an electric sharpener. Rrr. The graphite comes out nice and pointy. The sharpened-down paper around it looks white.


I sharpen another one (same kind). The sharpened-down paper on this one looks white. But also: The white has these wavy red, blue and black lines in it. Neat.


That’s all I have to say about pencils.


Pointy-headedly,
Twig


P.S. Hardened glue holds them together, so recycled pencils can be harder to sharpen.


Notes:
Recycled pencils come painted in other colors besides green, of course. And the graphite/lead in them comes in other colors besides gray.


People have different opinions about the environmental benefits, or not, of recycled-material pencils, no matter if the material is newsprint, scrap wood, old money or old blue jeans. Making recycled pencils takes energy, of course — for grinding, shredding, forming them, etc. — plus non-”green” stuff like paint and glue. So there’s that.


Pencils made out of trees, meanwhile, need cutting, shaping and so on. They also, ideally, should be sustainably managed. That means making sure that both the supply of trees and the health of the forest both stay good pretty much forever.
Related Posts with Thumbnails